When you look at the sensitivity of a microphone on its spec sheet, you will find a nominal value and a tolerance of that stated value. As an example, sensitivity specifies the output of a microphone when in a 94 dB SPL. On the spec sheet, it may look something like this:
Sensitivity, nominal ±3 dB at 1kHz: 20 mV/Pa; -34 dB re. 1V/Pa.
What is nominal? Why are tolerances needed? What is the accuracy of the microphone specs?
In any production, including the manufacturing of microphones, the product is designed to comply with specific predefined measures – nominal values. These measures can be related to anything measurable: dimensions, color, electric performance, and so on.
To pass production control, the measures of the produced element must be within specific limits. For example, if a microphone capsule’s housing is mechanically off-target, it may not fit the preamp. Likewise, individual microphones will sound and perform differently if sensitivity and frequency response don’t comply with specific limits.
Tolerances in production
In any production, deviations from target values occur. This is true whether it is mechanical measures, electrical measures or any other. Absolute precision is preferred; however, it does not exist. That is why tolerances are introduced. Even when focus is placed on delivering consistent quality, a microphone still undergoes many processes during manufacturing, and each of these has a nominal value and a tolerance.
For each process, there can be one of three outcomes: spot on nominal value, too low or too high. However, in real life, it is most likely to be either two too low or too high.
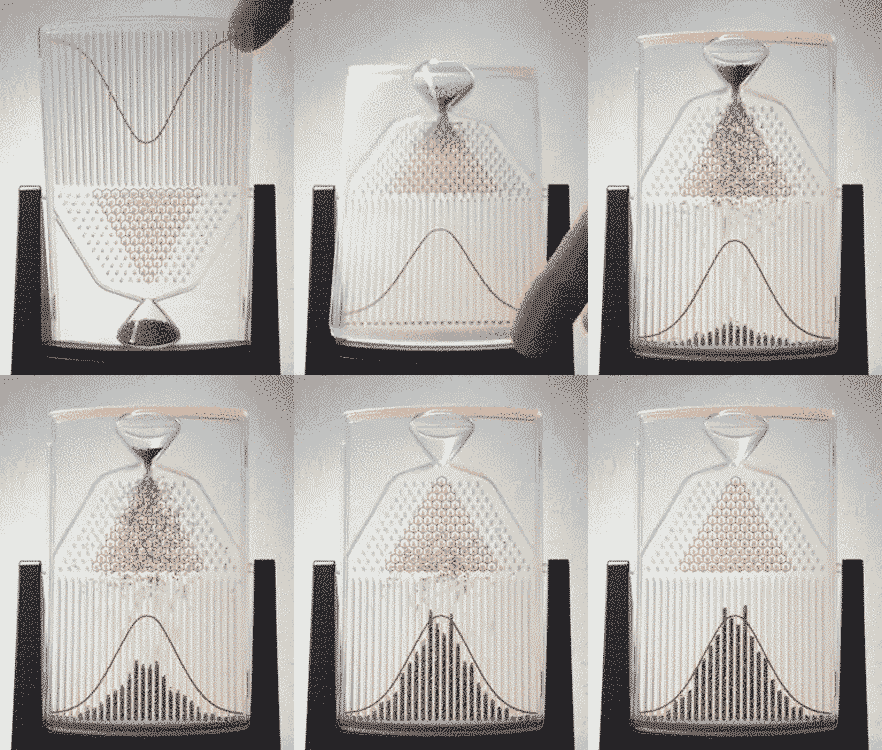
The sum of all the subprocesses of microphone production (or any type of production) can be shown in a triangle, illustrating the output of each of the subprocesses. In this way, we can visualize that there are substantially different paths for which an individual microphone can end up in its final shape.


Figure 1. Illustrates how individual process passes can lead to multiple outcomes. At the top, there are only two outcomes, but moving downwards, many possible paths are possible. As an example, manufacturing a 5 mm miniature microphone takes more than 100 subprocesses and consists of many materials and components that each comes with a nominal value and a tolerance.
Processes and materials can be tweaked to give a higher likelihood for the wanted outcome, but it is impossible to get the exact same values each time. Therefore, manufacturers specify a nominal value with a tolerance band around it.
Tolerances in measuring
Tolerances do not only apply to manufacturing but also the measurement of a product. Measurement tolerance relates both to the precision of the measurement technique itself and the measured data’s read-out. Usually, numbers are rounded, providing a value sufficiently precise to describe the result.
Fig. 2 shows a professional acoustic calibrator for measurement microphones. This device provides a very accurate sound level @94 dB SPL (1 Pa) which is known as the reference value. (This shown unit can also output +20 dB more.) It is regarded as a high-precision calibrator, the best in its class. However, the specs of this calibrator show an accuracy of ±0.2 dB.
Figure 2. Professional Acoustic Calibrator (Brüel & Kjær type 4231)
Further, the output level reading device may exhibit similar accuracy.
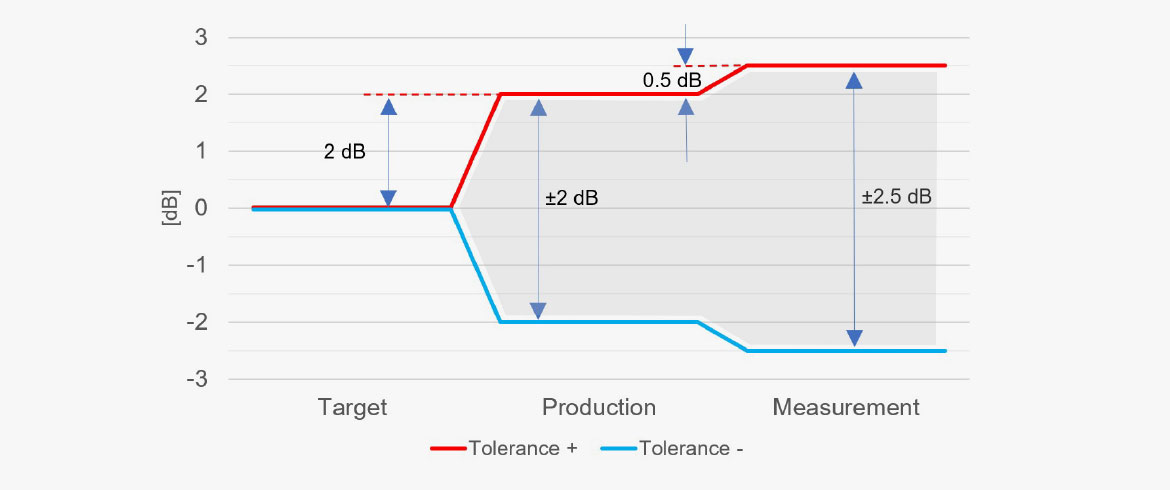
These tolerances add up when presented on the spec sheet. See figure 3 for the summation of tolerances.
Figure 3. Tolerances determine the accuracy of the final product specification.
As a result, the final measured value is subject to tolerances. At DPA, the sum of measurement tolerances is ± 0.5 dB as shown above.
Distribution of values within tolerances
There are two main methods of producing microphones within given tolerances.
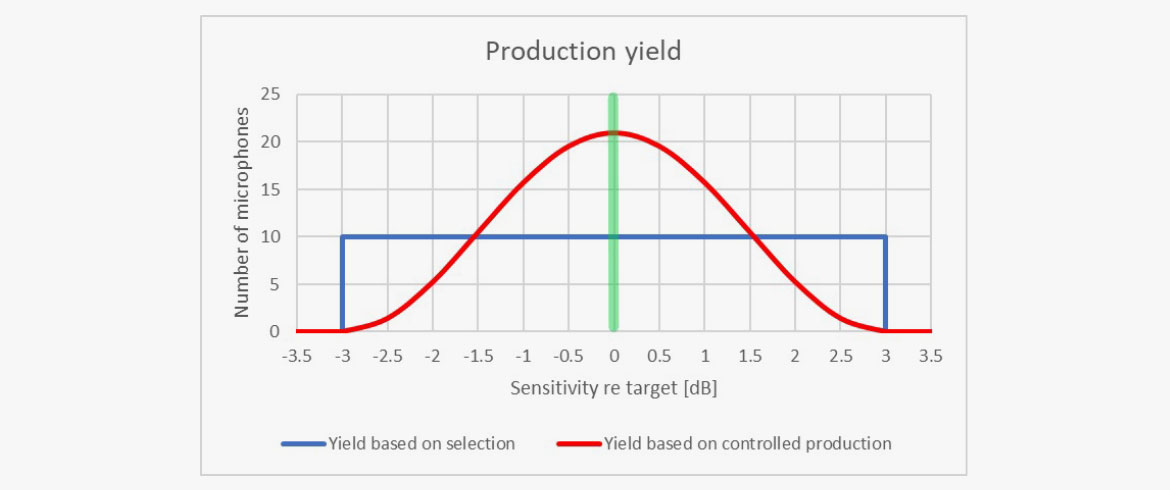
Selection. You produce the best you can, but the sensitivity values can vary widely. You then select the units which fall inside the decided tolerances. The blue curve in the diagram below shows the principle of distribution of data within limits based on this methodology.
Precision. You are more precise and aim for the target value during the production process. Tolerances still exist. However, the number of units close to the tolerance limits is clearly diminished. Most microphones are either on target or very close to the target, even though the tolerances applied are the same as the “selection method”.

Figure 4. The outcome of two different production strategies. The blue curve shows the production yield based on selecting within limits. The red curve shows the yield when controlling the production process. More units are closer to the nominal value (the green line) in the latter case, the method applied by DPA.
What do tolerances mean to the user?
In larger productions, for theatres and the like, the same type of microphones must perform identically. If one microphone – for whatever reason – breaks down, it should be possible to replace that single microphone without needing to re-calibrate the entire system. In theatre, broadcast, conference productions, and other similar situations, all identical microphone types should perform the same way.
It is less critical (or doesn’t really matter at all) if you only have one microphone, as you usually compensate for the absolute sensitivity by adjusting the gain setting.
Conclusion
Any mic you purchase from DPA has been thoroughly tested to meet extremely tight sensitivity tolerances. The 6060 Series Subminiature Lavalier has sensitivity tolerances that are even tighter (± 2.4 dB, i.e. ±1.9 dB production tolerances) than the 4060 Series Omnidirectional Miniature. You can count on DPA to deliver mics that offer consistent sound as well as sensitivities.

0 Comments for “DPA Microphones: Tolerances in Microphone Production”